Expert tips for installing wood flooring
To ensure your wood floor lasts a lifetime, choosing the right installation method is just as important as selecting the flooring itself. Issues such as movement, creaking, and gaps often result from poor installation rather than the product. Proper installation not only improves longevity but also helps prevent costly problems down the line. In this blog, we explore some of the most common issues that can occur, alongside expert guidance on how to avoid them, based on real-world experience. We’re also excited to feature expert advice from Martin Hall of Hall Timber Restoration. With decades of experience in wood flooring, and over 15 years working with Russwood products, Martin shares his invaluable insights on best practice for fitting floors.

Understanding wood as a material
One of the most important things to understand when installing wood flooring is how it behaves as a material. Timber is hygroscopic, meaning it naturally absorbs and releases moisture from its surroundings. In cold, damp conditions, it will take on moisture and expand, while in warm, dry environments, it can lose moisture and shrink. Maintaining optimal humidity and temperature before, during, and after installation is essential to prevent long-term issues.
As a rule of thumb, we recommend temperatures between 18–20°C and relative humidity levels of 45–65%. These can be monitored with a humidity gauge or hygrometer.
Choosing the right flooring for your space
A key decision is whether solid or engineered wood flooring is best suited to your project.
Solid wood is often perceived as a more traditional or luxurious option. However, it can be more prone to movement if environmental conditions fall outside recommended temperature and humidity ranges. Solid flooring is well suited to fixing over joists on suspended floors, as in many cases, engineered boards are too thin, and this means an additional layer of plywood/chipboard is required.
If underfloor heating is being considered, solid boards over 150mm wide are generally not recommended due to reduced stability. Engineered flooring, on the other hand, is suitable for the majority of projects. Its layered construction improves stability, making it ideal for use with underfloor heating and in environments where wider boards are desired. It also allows for larger spans during installation, often reducing the need for internal expansion gaps.
From Martins Experience, engineered flooring can be better for heat transfer of underfloor heating, and typically move less overall.
By selecting the right option for your project’s conditions, whether solid or engineered, you’ll ensure durability and stability that lasts for years to come.
Acclimatisation and movement of wood flooring
Acclimatisation is the process of allowing wood flooring to adjust to the temperature and humidity of its installation environment before fitting. Typically, boards should be stored in the room where they’ll be installed (after all wet trades are complete) for at least 1-2 weeks for engineered flooring, and 2-3 weeks for solid flooring.
Skipping or shortening this stage can lead to serious issues such warping and gaps after installation, which can be costly to remedy. It is also important to allow for seasonal movement. Wood flooring can take up to a year to season, due to dry air from heating systems in winter and higher humidity in summer.
Martin stresses the importance of following expansion guidelines carefully. Expansion gaps around the perimeter – often hidden by skirting or shadow gaps – are key to accommodating this movement. For larger projects (generally spanning over 10–15 metres in width), we recommend incorporating expansion joints where possible.
Martin advises against worrying that expansion gaps will compromise the overall look. He has seen large-scale projects where they have been incorporated neatly using materials such as cork filler or thresholds to minimise their appearance in situ.
Planning these details early ensures functionality without compromising aesthetics. For tailored advice, contact our Flooring & Interiors team.
Subfloor preparation
Before installing, make sure your subfloor is prepared. It should be dry, level, and clean.
For concrete, moisture testing with a hygrometer is essential to avoid warping or adhesive failure. Timber subfloors should be solid and free from rot. As a guide, allow no more than 3mm of subfloor deviation over a 2m span. A little preparation now prevents big problems later. For full details, check out our preparation guide.
Many of the issues Martin has encountered over the years can be traced back to concrete subfloors not being sufficiently dry at the time of installation. It is essential that the concrete is allowed to dry to the correct moisture level before any floorboards are fitted; if the screed retains too much moisture, adhesives cannot bond effectively, leading to glue failure and poor board adhesion.
He also recommends that installers follow the manufacturer’s instructions carefully for all self‑levelling compounds. Certain anhydrite screeds, for example, require the additional step of removing the soft surface layer known as the laitance. If the manufacturer specifies this step, it is essential that the laitance is fully removed, as failing to do so can lead to poor adhesion and eventual glue failure.
Martin also warns against installing acclimatised floorboards onto joists with a high moisture content. If the timber joists are too wet, or have dried only to an external moisture level, moisture can transfer into the floorboards, causing warping and loosening the fixings over time.

Installation methods: which is best?
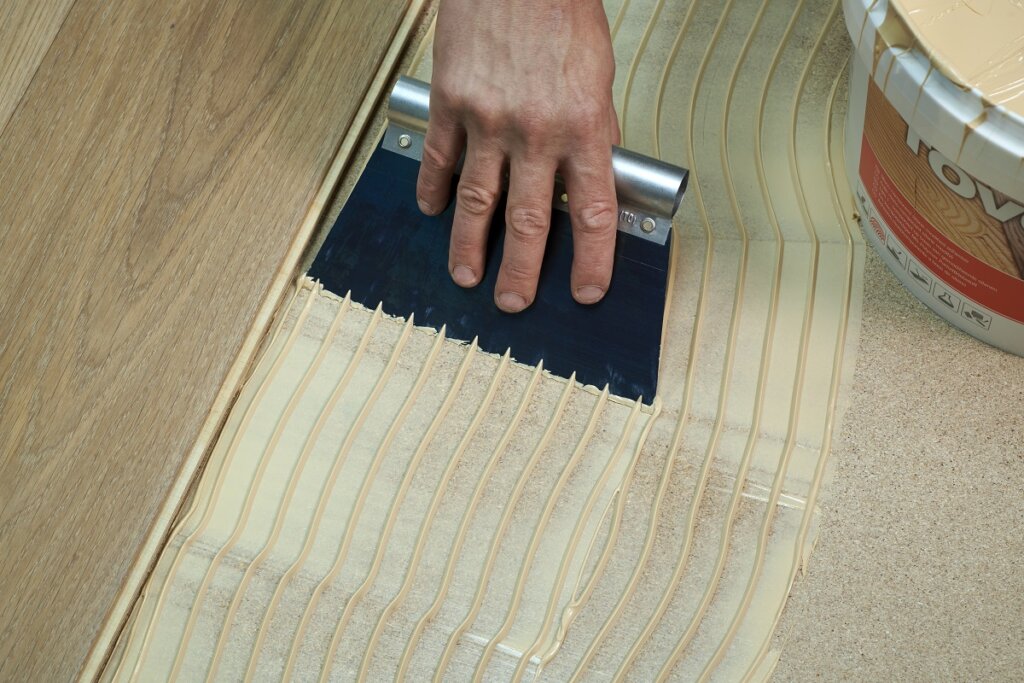
Choosing the right installation method is key to your floor’s performance and longevity. The most common options are fully bonded, secret nailed, floating, and semi-floating. Secret nailing, where boards are fixed through the tongue into timber joists, is ideal for solid floors over suspended structures. Floating floors, laid over underlay, can be a quick option for DIY projects but may feel less stable underfoot and are not recommended over underfloor heating because of increased movement. Where floating is being considered, semi-floating with adhesive underlay offers a more secure fit without permanent bonding or damage to the subfloor.
Gluing is the most secure fixing method. Martin recommends using it wherever possible to achieve the most stable result. A fully bonded installation provides a solid feel underfoot, works with most subfloors, and is well suited to underfloor heating. For the best long-term stability, we recommend this method wherever possible, particularly for our Signature Collection, where a secure bond is essential for larger board dimensions. Further details can be found in our installation page.
Do’s and don’ts of wood flooring installation
- Do ensure wet trades are complete before acclimatising.
- Do ensure the flooring is properly acclimatised.
- Do consider expansion joints if required.
- Do monitor relative humidity and temperature levels.
- Don’t hesitate to reach out to an expert for further advice if required.
- Don’t skip testing for moisture.
- Don’t forget to incorporate a perimeter expansion gap.
Correct installation is essential to protect your wood floor and ensure it performs beautifully for years to come. Expert, experience-led advice can make all the difference when specifying or installing flooring, helping you avoid costly mistakes and achieve the best possible result. At Russwood, we are here to support you at every stage of your floor’s journey, from order to installation and beyond.

Would you like to find out more?
For expert guidance tailored to your project, contact our Flooring & Interiors team today.
You may also like
Everything you need to know about underfloor heating and wooden flooring
Last Updated: 26th Mar, 2024
Read more